

If you’ve been thinking about upgrading a corner of your home into a proper “sit down and actually relax” spot, Tumbons can be a surprisingly practical win. They’re comfortable, flexible, and easy to fit into real life, whether that means a balcony that barely fits two chairs or a backyard where everyone somehow ends up gathering. In this guide, I’ll walk you through how to install Tumbons at home in a way that feels doable, even if you’re not the kind of person who keeps a toolbox perfectly organized.
- What Are Tumbons in a Home Improvement Context?
- Why Proper Installation Matters More Than People Think
- Tools and Materials You’ll Typically Need
- Quick Checklist: Before You Open the Box
- Parts You’ll See in Most Tumbons Kits
- Step-by-Step: How to Install Tumbons at Home
- Where to Place Tumbons for the Best Results
- Common Installation Mistakes (and How to Avoid Them)
- Maintenance After Installation
- Real-World Setup Scenarios
- FAQs About Installing Tumbons at Home
- Conclusion: A Solid Install Makes Tumbons Feel Like a Real Upgrade
Before we get into the steps, here’s the one thing to remember: installing tumbons is less about “construction” and more about smart setup, safe placement, and correct assembly. Do it right once, and you’ll avoid wobbling frames, scratched floors, and that annoying feeling that something is slightly off every time you sit down.
What Are Tumbons in a Home Improvement Context?
In home improvement terms, tumbons are best understood as versatile lounging seats that can be used indoors or outdoors, often with adjustable positions and lightweight frames. Think of them as the bridge between a standard chair and a full lounge setup.
Most tumbons fall into one of these categories:
- Indoor tumbons: Often fabric-forward, designed for living rooms, reading corners, or sunrooms.
- Outdoor tumbons: Built with weather-resistant materials like treated wood, powder-coated metal, or synthetic rattan.
- Foldable or modular tumbons: Great when you want comfort but still need your space back after guests leave.
Home improvement comes into it because the “installation” usually includes a mix of:
- assembling parts properly
- choosing a stable location
- protecting floors or decking
- anchoring or securing if needed
- fine-tuning comfort and alignment
Why Proper Installation Matters More Than People Think
A lot of people treat tumbons like “just furniture.” Then the same issues show up again and again: a slight wobble, uneven legs, fabric that loosens too fast, squeaks, or rust spots because it was placed in the wrong environment.
A correct install helps you:
- Increase stability and safety (especially around kids, pets, and pool areas)
- Extend the lifespan of joints, hinges, and reclining mechanisms
- Prevent surface damage to tile, wood floors, laminate, or decking
- Keep the seating posture comfortable, not awkward or forced
In other words, a tumbon that’s installed well feels better every single time you use it.
Tools and Materials You’ll Typically Need
You won’t always need everything on this list, but having these nearby makes the process smoother.
Basic tools
- Phillips and flathead screwdriver
- Allen keys (often included with the tumbon)
- Adjustable wrench or small socket set
- Measuring tape
- Level (small bubble level is fine)
- Soft cloth and mild cleaner for wipe-down
Optional but helpful
- Thread locker (light-strength) for screws that loosen over time
- Felt pads or rubber feet for indoor floors
- Anti-slip mat for tile or smooth surfaces
- Outdoor furniture cover (if it will live outside)
- Wood deck pads or protective tiles for balcony use
Quick Checklist: Before You Open the Box
This is where you save time and avoid frustration.
- Pick the install area first
- Indoors: confirm there’s enough clearance for recline or footrest extension.
- Outdoors: confirm the surface is stable and drains well after rain.
- Check the flooring
- Smooth tile and polished concrete can be slippery.
- Wooden floors can scratch easily.
- Decking can flex, so you may need leveling pads.
- Plan for sunlight and moisture
- Constant sun can fade fabric and dry out finishes.
- Moisture can rust metal hardware or swell untreated wood.
- Unbox carefully
- Don’t cut deep with a blade. It’s an easy way to nick fabric or scratch coated frames.
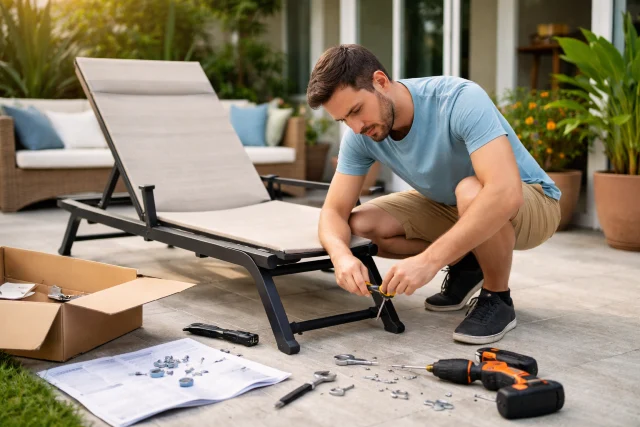
Parts You’ll See in Most Tumbons Kits
Most tumbons come with a mix of frame pieces and small hardware. Typical components include:
- Side frames (left and right)
- Base support bars or cross braces
- Seat platform or sling fabric
- Backrest frame and reclining mechanism
- Armrests (some models)
- Footrest components (some models)
- Screws, washers, and nuts (usually separated by size)
- Allen key or assembly tool
Tip that saves headaches: before tightening anything, dry-fit the pieces first. That means loosely connecting parts so everything lines up naturally.
Step-by-Step: How to Install Tumbons at Home
Step 1: Prepare your workspace
Choose a flat area with good light and enough room to lay parts out. If you’re assembling indoors, put down an old sheet or cardboard to protect floors.
Do a quick wipe-down of parts. Sometimes there’s manufacturing dust or packing residue, especially on coated frames.
Step 2: Sort hardware and match it to the instructions
This sounds basic, but it’s the step people skip, then regret later.
Lay out screws and bolts in small groups and compare them to the manual. If the manual labels them (A, B, C), create three little piles. If it doesn’t, sort by:
- length
- head type
- whether washers are included
If you have two bolts that look almost identical, don’t guess. The “almost identical” one is usually the one that causes misalignment.
Step 3: Assemble the main base frame first
Start with the part that touches the floor. Usually this means connecting the left and right side frames with cross supports.
- Insert bolts loosely.
- Add washers where the instructions show them.
- Tighten only until snug, not fully tight.
Why not fully tighten yet? Because frames often need a tiny bit of flex while you attach the next parts. If you lock everything too early, the last screw won’t line up and you’ll end up forcing it.
Step 4: Add support bars and stability braces
Many tumbons have one or two stability bars that prevent side-to-side movement.
This is the part where a lot of wobble problems are born. Make sure:
- braces are installed in the correct direction
- screws go through the correct holes, not “close enough” holes
- you tighten evenly on both sides so the frame stays square
If your tumbon has a center support foot, adjust it so it touches the ground evenly.
Step 5: Install the seat or sling surface
There are two common setups:
A) Fabric sling style
- Slide fabric into rails or hook it into slots.
- Ensure tension is even.
- Avoid twisting the sling. It should sit flat and centered.
B) Panel seat style
- Align the panel with pre-drilled holes.
- Install screws diagonally (top-left, bottom-right, top-right, bottom-left) so pressure distributes evenly.
If the seat feels slightly off-center, fix it now before moving forward. Once the backrest is installed, it becomes harder to correct.
Step 6: Attach the backrest and reclining mechanism
This is the “pay attention” step.
The reclining mechanism usually has:
- a pivot point (hinge bolt)
- a lock or notch system (for angle positions)
- sometimes a tension knob or safety pin
Install the hinge bolts loosely first, then test movement before fully tightening.
What to check:
- does the backrest move smoothly without scraping?
- does it lock into positions cleanly?
- are both sides engaging at the same time?
If one side locks and the other doesn’t, stop and re-check alignment. Forcing it can bend the mechanism over time.
Step 7: Install armrests, footrest, or accessories
Not all tumbons include these, but if yours does:
- Armrests: attach after the backrest, because they often align with the same frame points.
- Footrest: verify it extends and retracts without catching.
- Cushions: don’t tie them on until you’ve tested the final recline angles.
A good rule: anything that changes how you sit should be installed after the structure is stable.
Step 8: Level the tumbon on your floor or patio
Now you tighten everything, but do it methodically.
- Place the tumbon where it will live.
- Use a small level or do a simple wobble check by pressing gently on opposite corners.
- If it rocks:
- add rubber feet or pads
- adjust leveling glides if included
- move slightly if you’re on uneven decking seams
This is also where anti-slip solutions help on tile, polished concrete, or smooth stone.
Step 9: Tighten all bolts in a final pass
Once everything sits level, tighten in a logical sequence:
- base frame bolts first
- cross braces next
- seat mounts
- backrest hinge and lock points
- accessories last
Don’t over-tighten. Stripping a bolt head or cracking plastic hardware is a real thing, especially on budget models.
If you want extra security for screws that loosen over time, use a small amount of light-strength thread locker on the threads.
Step 10: Safety check and comfort test
Do a simple test before declaring victory:
- Sit down slowly, shift your weight side-to-side.
- Recline one notch at a time.
- Check for new squeaks or clicking.
- Make sure all locking points hold firm.
If anything feels unstable, don’t ignore it. Usually it’s one of these:
- a brace installed backward
- uneven tightening left vs right
- washers missing at a pivot point
- hinge bolts too tight, causing binding
Where to Place Tumbons for the Best Results
Indoors: the “quiet comfort zone”
Great placement options:
- next to a window with natural light
- near a bookshelf or reading nook
- in a corner with a floor lamp
- near a soft rug so the area feels intentional
Floor protection matters here. Felt pads are the simplest fix for hardwood and laminate.
Outdoors: the “weather-smart zone”
If your tumbon is outside:
- avoid direct sprinkler spray
- keep it off soil or grass long-term (moisture wicks up)
- place it on pavers, deck tiles, or a stable patio surface
If you live in a humid area, hardware will last longer with occasional wipe-downs and keeping a cover on when not in use.
Common Installation Mistakes (and How to Avoid Them)
- Tightening too early: causes alignment issues later.
- Skipping washers: leads to wobble and faster wear at joints.
- Installing recline locks backward: makes the chair feel “broken” even when it’s not.
- Ignoring floor slope: creates rocking, stress, and annoying noise.
- Using outdoors without protection: even outdoor-rated materials benefit from covers and smart placement.
Maintenance After Installation
A tumbon that’s installed well still needs light maintenance. Nothing intense, just regular care.
Monthly (quick check)
- tighten any bolts that feel loose
- check recline locks for smooth engagement
- wipe dust and moisture off hardware
Seasonal (especially outdoors)
- clean with mild soap and water
- check for early rust spots and treat them quickly
- reapply protective finish if the manufacturer recommends it for wood
If the tumbon starts squeaking, it’s usually a pivot point. A small amount of appropriate lubricant on hinges can help, but keep it away from fabric.
Real-World Setup Scenarios
Scenario 1: Small apartment balcony
If your balcony is tight, foldable tumbons shine. The key is preventing slipping and protecting the surface.
Best setup:
- anti-slip mat underneath
- rubber feet or pads
- placement slightly away from railing to allow recline
Scenario 2: Family living room
You want comfort without wrecking your floor.
Best setup:
- felt pads for wooden floors
- rug placement to define the “relax zone”
- keep clearance from walls so the backrest can recline without bumping
Scenario 3: Poolside or garden
This is where hardware and moisture matter most.
Best setup:
- stable, non-sinking surface (pavers, deck, concrete)
- outdoor cover when not in use
- quick wipe-down after heavy humidity or rain
The way a tumbon supports your body is closely tied to basic ergonomics, which is why small setup details like seat height, recline angle, and stable footing can make a noticeable difference in comfort.
FAQs About Installing Tumbons at Home
How long does it take to install tumbons?
Most people take 30 to 90 minutes depending on design complexity. Foldable models with fewer parts are faster. Models with reclining and footrest systems take longer.
Do I need to anchor tumbons to the ground?
Usually no, especially for indoor use. For outdoor settings with strong wind exposure, it’s smart to add weight or secure placement so they don’t tip or slide.
Why does my tumbon wobble even after tightening?
Wobble usually comes from uneven flooring or uneven tightening. Re-check that the frame is square, then level it using pads or adjustable feet.
Can tumbons go on wooden decks?
Yes, but decks can flex and have small slopes. Use leveling pads and avoid placing the legs across gaps where one foot can sit lower than the others.
Conclusion: A Solid Install Makes Tumbons Feel Like a Real Upgrade
Installing Tumbons at home is one of those home improvement tasks that looks easy, then gets annoying if you rush it. But when you take it step-by-step, the payoff is immediate: better comfort, better stability, and a setup that feels intentional instead of temporary. Assemble loosely first, level the base where it will live, tighten in a final pass, and treat the backrest mechanism with extra care. Once that’s done, your tumbon becomes the kind of everyday luxury you actually use, not just something that looks good in the corner.