

If you are new to tarp camping, Tarnplanen can feel like one of those “pro” skills that only seasoned outdoors people bother with. In reality, it is one of the easiest upgrades you can make to your camp life once you learn a simple process. A Tarnplanen setup gives you flexible shelter from rain, wind, and harsh sun, and it packs smaller than most tents. The trick is not brute strength or fancy gear. It is choosing the right spot, getting a clean ridgeline, and tensioning the tarp the right way so it stays quiet and stable all night.
- What is Tarnplanen in camping?
- Why beginners love Tarnplanen camping
- Gear checklist for a reliable Tarnplanen setup
- Step 1: Choose a smart campsite first
- Step 2: Pick your Tarnplanen shelter style
- Step 3: Set your ridgeline
- Step 4: Attach the Tarnplanen to the ridgeline
- Step 5: Stake the first two corners
- Step 6: Stake the opposite side and tension evenly
- Step 7: Add guylines for stability
- Step 8: Adjust the pitch for weather
- Step 9: Make your sleeping area smarter
- Step 10: Safety basics most beginners overlook
- Common Tarnplanen camping mistakes and quick fixes
- Practical setup examples for real trips
- Quick reference table: which pitch should you use?
- FAQ: Tarnplanen camping setup for beginners
- Conclusion
In this guide, I will walk you through a beginner-friendly, step-by-step Tarnplanen camping setup that you can repeat anywhere, whether you are on a forest trail, a beach campsite, or a roadside stop on a long road trip.
What is Tarnplanen in camping?
In camping terms, Tarnplanen refers to a camouflage-style tarp or tarpaulin that you pitch as a shelter. Many people use Tarnplanen as:
- A primary shelter instead of a tent
- A rain cover over a hammock
- A communal hangout shelter over a cooking or seating area
- A lightweight emergency shelter when weather changes fast
The big advantage is adaptability. A tarp can be high and airy on a hot day, or low and tight when the wind starts pushing hard.
Why beginners love Tarnplanen camping
A lot of first-timers assume tarps are “basic” and tents are “advanced.” The truth is usually the opposite. A good Tarnplanen pitch can be simpler than wrestling poles, pegs, and inner tents, especially in wet weather.
Here is what beginners notice right away:
- Less weight and bulk: Great for hiking and minimalist travel.
- More ventilation: Less condensation compared to many tents.
- More options: You can pitch the same tarp in multiple shapes.
- Easy repairs: A small tear can often be patched quickly.
The only real learning curve is tension and angles, and you will get that down faster than you think.
Gear checklist for a reliable Tarnplanen setup
Before we get into the setup steps, let’s make sure you have the basics. You do not need expensive gear, but you do need the right pieces.
Essential items
- Tarnplanen tarp (beginner-friendly sizes: 3×3 m or 3×4 m)
- 6 to 10 stakes (stronger stakes if the ground is rocky or sandy)
- 2 to 4 guylines (plus extras if you want more stability)
- Ridgeline cord (about 8 to 12 meters is a safe start)
- Two attachment points (trees, trekking poles, sturdy branches, or tarp poles)
Nice-to-have items
- Line tensioners (helps you fine tune tension without re-tying)
- Small carabiners or soft shackles (quick connect points)
- Groundsheet or footprint (keeps your sleeping area cleaner and drier)
- Lightweight bug net (if you camp where insects are intense)
Beginner note on knots
You can absolutely tarp camp without being a knot wizard. But knowing a few basics makes life easier:
- A secure knot for your ridgeline
- An adjustable hitch for guylines
- A quick-release option for fast takedown
You will see where these matter as we go.
Step 1: Choose a smart campsite first
A good pitch starts with a good spot. If your site choice is sloppy, no “perfect knot” will save your night.
What to look for
- Durable surfaces where you will not crush fragile vegetation
- Natural wind protection like bushes or terrain dips
- No overhead hazards such as dead branches (often called widowmakers)
- Drainage: slight slope is fine, but avoid bowls where water collects
If you are in an established campground, use designated pads when possible. If you are camping more freely, avoid expanding impact into new areas. Leave No Trace guidance emphasizes camping on durable surfaces and minimizing “site creep,” where campsites grow larger over time due to repeated trampling.
Quick spacing tip
If you are tying between two trees, a beginner-friendly distance is about 3 to 5 meters apart. Too close and the tarp gets cramped. Too far and you fight sag.
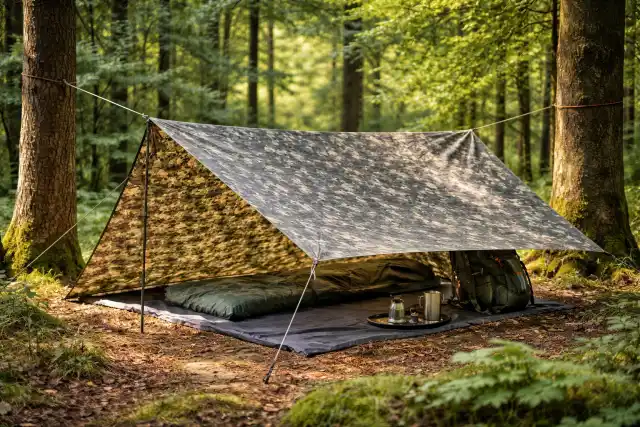
Step 2: Pick your Tarnplanen shelter style
For beginners, you want a pitch that is forgiving and weather-ready. These three are the best starters.
1) A-frame (best all-around)
- Great for rain
- Easy to tension
- Symmetrical and stable
2) Lean-to (best for views and airflow)
- Quick setup
- Good when weather is mild
- Not ideal in swirling wind or heavy rain unless pitched low
3) Diamond pitch (simple and fast)
- Works well with one main line and fewer stakes
- Good for smaller tarps
- Can be tightened quickly
We will focus on the A-frame first, because it is the most beginner-proof.
Step 3: Set your ridgeline
Your ridgeline is the backbone. If your ridgeline is solid, everything else becomes easier.
Ridgeline height
- For rain and wind: chest-height or a little lower
- For hot weather shade: a little higher for airflow
A practical approach many outdoor guides recommend is running the ridgeline around chest height, then adjusting down if the weather turns rough.
Ridgeline setup (simple method)
- Wrap cord around Tree A at about chest height and tie securely.
- Walk the cord to Tree B.
- Pull tension and tie off firmly.
- You should be able to pluck the line and feel solid resistance.
If you have a continuous ridgeline, even better. But beginners can start with a simple fixed line.
Step 4: Attach the Tarnplanen to the ridgeline
Lay the tarp over the ridgeline so the center seam runs along the cord if your tarp has one.
Two easy attachment styles
- Over the line: tarp draped over ridgeline, then corners staked
- Under the line: ridgeline above tarp, tarp clipped to it with loops or carabiners
Over-the-line is simplest when you are learning.
Alignment check
Before staking anything, step back and look:
- Is the tarp centered between the trees?
- Are both sides even?
- Is the ridgeline straight, not drooping?
Fixing alignment now saves you from redoing everything later.
Step 5: Stake the first two corners
Start with the corners on one side.
- Pull the first corner out at roughly a 45-degree angle from the ridgeline.
- Stake it down.
- Move to the second corner on the same side and repeat.
- Keep the tarp fabric smooth, not twisted.
You do not need it drum-tight yet. You are building shape first.
Step 6: Stake the opposite side and tension evenly
Now stake the two corners on the other side.
- Pull each corner out evenly so the A-frame looks symmetrical.
- Check the ridgeline again. If it starts sagging, tighten the ridgeline before you go further.
Beginner tension rule
Tension is about balance, not strength. If you yank one side too hard, you will fight wrinkles and sag elsewhere.
Step 7: Add guylines for stability
This is where your Tarnplanen starts feeling “storm ready.”
- Add guylines to midpoints if your tarp has them.
- Angle stakes away from the tarp for better holding power.
- Keep guylines taut but not overstressed.
Extra tie-outs reduce flapping, which helps you sleep better and reduces wear on the tarp.
Step 8: Adjust the pitch for weather
This is the part that turns a basic setup into a smart setup.
For rain
- Lower the ridgeline slightly
- Steepen the sides so water runs off fast
- Make sure no low “pockets” form where water can pool
For wind
- Pitch lower to the ground on the windward side
- Use extra stakes and guylines
- Consider a lean-to facing away from the wind if wind direction is steady
Wind chill can dramatically increase heat loss in cold conditions. Weather agencies explain that wind chill reflects how quickly your body loses heat in cold and windy weather, increasing frostbite and hypothermia risk as it drops.
For hot sun
- Raise the ridgeline for airflow
- Open one side higher to catch breezes
- Use the tarp as shade over your sitting area, not just your sleeping area
Step 9: Make your sleeping area smarter
A tarp is only half of comfort. The ground is the other half.
Simple sleeping layout
- Place a groundsheet under your sleeping pad
- Keep your sleeping spot slightly higher than the area where rain might run
- Store gear where it stays dry but does not block airflow
Pro beginner tip
If heavy rain is expected, keep your sleeping setup back from the edges. Splashback can wet gear sitting too close to tarp edges.
Step 10: Safety basics most beginners overlook
A Tarnplanen shelter feels open and airy, which is great. But “open” does not mean “risk-free.”
Carbon monoxide warning
Never cook inside enclosed shelter spaces or where fumes can build up. Public health agencies warn carbon monoxide is odorless and can be deadly, and consumer safety alerts document fatalities linked to camping equipment producing CO.
Fire and sparks
- Keep stoves well away from tarp edges
- Watch for wind shifting sparks toward fabric
- Avoid placing the tarp directly above open flames
Tree and anchor safety
- Use live, sturdy trees where allowed
- Avoid rotten branches and dead trunks
- Recheck knots and tension after 10 to 15 minutes because cord can settle
Common Tarnplanen camping mistakes and quick fixes
Mistake 1: Ridgeline too high in bad weather
Fix: Lower it. A low pitch is warmer, quieter, and more rain-proof.
Mistake 2: Not enough stake angle
Fix: Angle stakes away from the tarp, not straight down.
Mistake 3: Slack guylines at night
Fix: Retension after setup. Many materials loosen as temperatures change.
Mistake 4: Setting up in a water path
Fix: Look at the ground like water would. If it rains hard, where will it flow?
Practical setup examples for real trips
Scenario 1: Forest campground weekend
You arrive late, it looks like rain, and you want something quick.
- Choose A-frame
- Low ridgeline, steep sides
- Extra guylines on windward side
Result: dry sleeping area, minimal noise, easy morning pack-up.
Scenario 2: Beach camping or coastal road trip
Wind matters more than rain, and sand hates weak stakes.
- Use lower lean-to or low A-frame
- Use longer stakes or sand anchors if you have them
- Angle the shelter so wind hits the “back” not the open front
Scenario 3: Hot summer hike with midday sun
You want shade more than storm protection.
- Higher pitch
- One side lifted higher for airflow
- Use it as a communal shade tarp during breaks
Quick reference table: which pitch should you use?
| Pitch Style | Best For | Weather Strength | Beginner Difficulty |
|---|---|---|---|
| A-frame | All-purpose camping | Strong in rain and wind | Easy |
| Lean-to | Views, airflow, quick breaks | Moderate if pitched low | Easy |
| Diamond | Fast shelter, small tarps | Moderate | Easy to Medium |
FAQ: Tarnplanen camping setup for beginners
How tight should a Tarnplanen tarp be?
Taut enough that it does not flap, but not so tight that seams strain. If the tarp “drums” like a trampoline, you have probably overdone it.
Can I set up Tarnplanen without trees?
Yes. You can use trekking poles, sturdy branches, or tarp poles. The key is stable anchors and good guyline angles.
What size Tarnplanen is best for one person?
A 3×3 meter tarp is a solid starting point. It gives enough coverage for a sleeping area and gear, especially in an A-frame pitch.
How do I stop my tarp from sagging overnight?
Retension after a few minutes and again before sleep. Temperature drops can loosen lines, and wet cord can stretch.
Is tarp camping safe in heavy rain?
Yes, if pitched correctly: low ridgeline, steep sides, no pockets, and a smart campsite with drainage.
Conclusion
Once you learn the rhythm, setting up Tarnplanen becomes one of those travel skills that pays you back every single trip. You stop stressing about whether you brought the “right shelter,” because you can adapt your pitch to the place you are in and the weather you are actually getting. Start with the A-frame, practice it a few times in fair weather, and you will be surprised how quickly it becomes second nature.
And if you want one last mental shortcut, remember this: your shelter is only as good as your site choice and your tension. Keep your ridgeline solid, pitch lower when conditions get rough, and treat your tarp like a shape you are balancing, not a blanket you are yanking tight. For a deeper background on the material itself, the word tarpaulin is worth knowing, because it explains why these sheets work so well as lightweight shelter.
With that, you are ready. Pick a simple spot, follow the steps, and enjoy the kind of camp setup that feels both rugged and oddly satisfying.